RabbitMQ is a message queuing system. The message queue, in turn, provides a way to communicate asynchronously between the various components of the system. RabbitMQ is implemented on the AMQP protocol.
AMQP is an open-source protocol that defines how a system should exchange messages. The protocol defines a set of rules that needs to be followed by the systems that are going to communicate with each other. In addition to describing the way systems communicate with the broker, it also standardizes the commands and messages that systems exchange. Since AMQP is written in open source, its community is quite large and brokers and client parts are implemented on it in many programming languages.
Below I will outline the AMQP concepts:
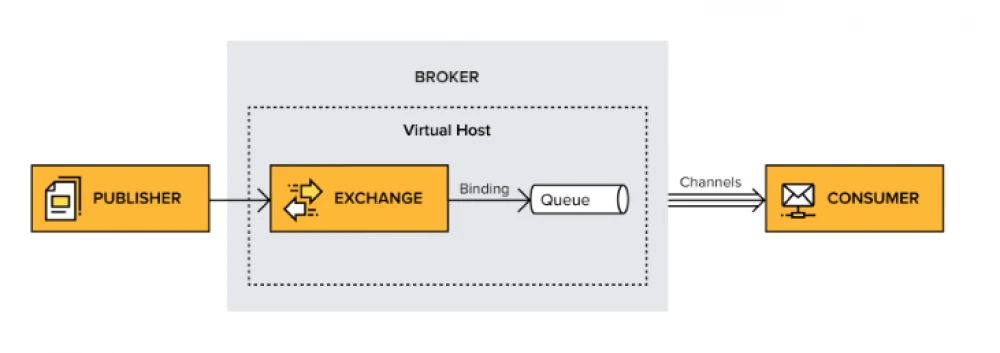
- Message broker is a part of an application that receives messages from one application and delivers to another.
- Virtual host is part of the broker. It is a way to separate applications that use the same RabbitMQ. For example, you can separate the environment by virtual hosts dev and staging so that they are isolated from each other. Users, messaging, queues are all isolated on a virtual host. A user connected to a specific host cannot see data on another host.
- Connection is a physical TCP connection between applications and a broker. When a client disconnects or the system crashes, the connection is closed.
- Channel is a virtual connection within a connection. It will reuse the existing connection to save resources and not force the systems to establish a new connection. When a new message is published or requested, the entire process takes place inside the existing connection.
- Exchange is the application of such rules to the messages by which they reach their destination. In other words, the exchange process makes sure that the received message arrives on a specific queue. Which queue a message enters into depends on the rules defined for that message type. The queue must be associated with at least one exchange in order to receive messages.
- Queue is an ordered list of messages. The queue exists inside the broker.
- Binding is a virtual connection between an exchange and a queue within a broker. It allows messages to flow from the exchange to the queue.
RabbitMQ is an Erlang implementation of AMQP. Erlang has been chosen because of its intrinsic support for building highly reliable and distributed applications. Indeed, Erlang is used to run telecommunication switches in several large telecommunication systems, and a total system's availability of nine nines has been reported (that's only 32 milliseconds of downtime per year). The application can run on any operating system. But in this article, we will be installing RabbitMQ on Ubuntu.
RabbitMQ uses Mnesia as data storage - this is a database that processes data both in memory and on disk, also written in Erlang. Mnesia stores information about users, exchanges, queues, connections, etc. The queue index stores the position of the message and information about whether it was delivered or not.
RabbitMQ usage scenarios
Message queues are often used in microservice architectures. But what does this mean?
Microservice architectural style divides the application into small services, with the finished application being the sum of its microservices. The services are not strictly connected to each other. Instead, they use, for example, message queues to keep in touch. One service asynchronously pushes messages to a queue and those messages are delivered to the correct destination when the consumer is ready.
The microservice architecture is often compared and contrasted with the monolith architecture, where the entire system is bundled together into one piece of software. One application is not only responsible for a particular task; it actually performs every step needed to complete a particular function. Monoliths communicate within the system since all the parts are running in the same process. This system is highly coupled since every function is reliant on the others.
Events, tasks, notifications tell the application that something has happened. One application can subscribe to events from another and do the necessary operations.
For example, imagine a regular social network. If one user publishes a post, then his friends, who have the notification enabled, should see this post in their feed. This operation is quite resource-intensive, so it makes sense to put the post publication event in the queue. And then process it asynchronously by distributing the post among the user's friends.
Installing RabbitMQ.
To get started, you need to go through three steps:
- Install a broker
- Install the broker management plugin
- Configure host and user.
Installing a broker.
The installation process is pretty straightforward:
- Update Ubuntu.
- Download and install the repository key.
- Check the key in the repository.
- Install RabbitMQ.
So let's update the system first. Let's run two commands in turn:
sudo apt-get update
sudo apt-get dist-upgrade
RabbitMQ requires several software packages. Verify that all of them are installed:
sudo apt install curl, gnupg -y
sudo apt install apt-reansport-https
The option -y accepts any licenses for these dependencies. Ubuntu installs all required sub-packages.
Discover the name of the operating system by running any of the following commands:
cat /etc/os-release
lsb_release -a
hostnamectl
Now let's add a key:
curl -1sLf "https://keys.openpgp.org/vks/v1/by-fingerprint/0A9AF2115F4687BD29803A206B73A36E6026DFCA" | sudo gpg --dearmor > /usr/share/keyrings/com.rabbitmq.team.gpg
sudo tee /etc/apt/sources.list.d/rabbitmq.list <<EOF
deb [signed-by=/usr/share/keyrings/io.cloudsmith.rabbitmq.E495BB49CC4BBE5B.gpg] https://dl.cloudsmith.io/public/rabbitmq/rabbitmq-erlang/deb/ubuntu bionic main
deb-src [signed-by=/usr/share/keyrings/io.cloudsmith.rabbitmq.E495BB49CC4BBE5B.gpg] https://dl.cloudsmith.io/public/rabbitmq/rabbitmq-erlang/deb/ubuntu bionic main
deb [signed-by=/usr/share/keyrings/io.cloudsmith.rabbitmq.9F4587F226208342.gpg] https://dl.cloudsmith.io/public/rabbitmq/rabbitmq-server/deb/ubuntu bionic main
deb-src [signed-by=/usr/share/keyrings/io.cloudsmith.rabbitmq.9F4587F226208342.gpg] https://dl.cloudsmith.io/public/rabbitmq/rabbitmq-server/deb/ubuntu bionic main
EOF
sudo apt-get update -y
RabbitMQ is written on Erlang, that is why we will need additional dependencies:
sudo apt-get install -y erlang-base \
erlang-asn1 erlang-crypto erlang-eldap erlang-ftp erlang-inets \
erlang-mnesia erlang-os-mon erlang-parsetools erlang-public-key \
erlang-runtime-tools erlang-snmp erlang-ssl \
erlang-syntax-tools erlang-tftp erlang-tools erlang-xmerl
Run the following commands to install RabbitMQ:
sudo apt install -y rabbitmq-server
sudo apt install librabbitmq-dev
Last library includes a client for interacting with the broker. However, the server may be the only requirement.
After installation you can run RabbitMQ following way:
rabbitmq-server start
The server starts in the foreground. To run the broker as a service, use the following commands:
sudo systemctl enable rabbitmq-server
sudo systemctl start rabbitmq-server
sudo systemctl status rabbitmq-server
systemctl command command can also be used to manage services in Ubuntu. The output of the final command should show that the broker is running.
Check status of RabbitMQ you can use with following command:
sudo service rabbitmq-server status
Now it's time to install the RabbitMQ management plugin. It is needed so that we have a visual interface for managing queues.
The package installs several scripts during installation. One of them is rabbitmq-plugins. Its task is to install and remove additional plugins. Use it to install the control panel:
sudo rabbitmq-plugins enable rabbitmq_management
Yes, it was very easy!
Now just open browser and access management panel:
http://127.0.0.1:15672
When you open the page, you will be asked for your username and password. But we didn't create users. Let's do that. To do this, use the rabbitmqctl command:
sudo rabbitmqctl add_user cc-admin admin123
sudo rabbitmqctl set_user_tags cc-admin administrator
By default, a guest with a default password is available to you. For security, change its password:
sudo rabbitmqctl change_password guest guest123
Now you can enter the control panel using the login cc-admin and password admin123
But we created only an administrator, he does not have the ability to monitor the exchange or queue or manage virtual hosts. For the development process, you need to create a user with development rights.
sudo rabbitmqctl add_user cc-dev dev123
As discussed earlier, RabbitMQ puts everything in a kind of folders that are isolated from each other. These are called virtual hosts. We need to create the first virtual host, which will store our queues:
sudo rabbitmqctl add_vhost cc-dev-vhost
This command will create a virtual host for development.
Now we need to bind users to our host:
sudo rabbitmqctl set_permissions -p cc-dev-vhost cc-dev ".*" ".*" ".*"
This command grants full write, read and modify permissions.
Now you can say that RabbitMQ broker and control panel have been successfully installed, you can get to work!